The materials you need are:
-mini blinds to fit your window.
-fabric slightly wider and longer than your blinds.
-Fabric glue. The tutorial says not to use hot glue. I'm not sure why, but I was scared away from the hot glue so I bought fabric glue.
- A tape measure
-Scissors
-A flat head screwdriver may be needed
My window is a goofy size, 47" wide. I finally found blinds that size at Lowe's for only $11. I used 54" decorator fabric from Joann's. It was originally around $25 a yard (yikes!), but I ended up getting it for under $6 a yard on clearance combined with an additonal sale on clearance fabric combined with an extra discount coupon for 10% off everything. I used about a yard and a half for my window which is 45" tall. I wish now that I had bought more of the fabric because I ended up liking it so much!
First begin by lowering the blinds all the way and laying them out flat.
Next you want to cut all the little, thin tilt strings around each blind slat. My wide blinds had 5 sets of these. I was able to run scissors along them and cut them pretty quickly because they are so thin. Do not cut the thicker, lift strings! You will need these for the blinds to work.
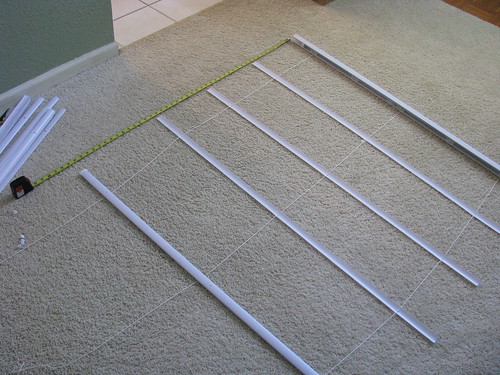
Remove and discard all the other slats, leaving only those left that you want to use for the folds in your shade. I decided to only use 3 middle slats because my window is not very tall. Therefore, my shade will have 3 folds in it spaced slightly over 11" apart. If you have a taller window, or want your folds smaller and closer together, than you would leave more slats left on the strings.
You should end up with something like this. Again,I left only three slats on the strings for mine.
Now you are ready for your fabric. Lay out the fabric face down and place your blinds on top. I put my blinds so the pull cord was facing up, but it probably doesn't really matter. Cut around the fabric, leaving a couple inches on each side.
Now it's time to glue. First fold over the top of the fabric so that you have a nice crisp seam and glue. Then glue the top of the blinds on top of this fabric. You want the crisp seam to line up with the top edge of the blinds. Do not glue the very ends (left and right side) to the fabric though, leave about 2"-3" loose and not attached to the top bar so that you can reinstall the blinds later. (See the tutorial at Little Green Notebook for more info. on the gluing process since I didn't take as many photos as I should have!)
Next glue your slats down to the fabric. I put them so that the rounded side was against the fabric so that the glue and the slats had the most contact with the fabric.
Then fold the sides in and glue those down. Finally, fold up the bottom and glue it to the bottom slat piece. I ran out of fabric glue so I did use hot glue on the very bottom piece. It worked fine. If you have a kitty to help you hold down the edges while gluing, that can be a help too. Or a hindrance when they try to eat the strings.
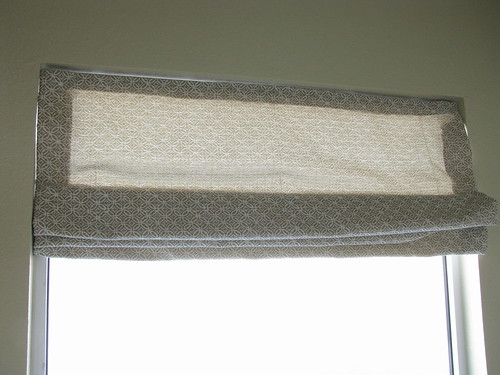
Here's how my blinds look when they are completely down. (I made them a little bit short, oops!) You use the pull cord just like you would with the regular blinds to raise and lower the shade.
It probably sounds a bit complicated, but it only took me an hour or so and I love the result. I will be trying this in another room sometime soon.


Those instructions sound so easy to follow and I love the idea of taking plain old venetians and making them so pretty.
ReplyDeleteIf you like jewelry, come check out the give-away I am hosting - it ends Friday night.
Woah! You go girl! That looks like a lot of work, but is SO cute!
ReplyDeleteI might have to try this one out!
Shelley
I really, really like your shades. The fabric is wonderful and I like that it doesn't seem too hard. The end result is wonderful. Great job.
ReplyDeleteoh wow, that does look easy! I may try those for my dining room.
ReplyDeleteI couldn't believe my eyes
ReplyDeletegood job
Love that idea!
ReplyDeleteThis is a great tutorial on a project I have been meaning to try - but I couldn't remember the directions! I'm so glad I found your blog, and that you took such clear pictures and wrote easy to follow instructions. Thank you very much!
ReplyDeleteOne thing I'd like to know: how did my kitty "Lady" get into your picture? We must have twin cats - separated at birth!
I'd love for you to stop by for a visit sometime.
XO
Heidi - Heart and Home
Wow...love this idea! can't wait to try it! You did a great job.
ReplyDeleteWhat a neat idea! I've been thinking of making roman shades for our master, I may have to try this, because we currently have ugly shades--this way i could re-use them!
ReplyDeleteWow! Great idea! I had no idea this was possible! *storing away for future use* LOL
ReplyDeleteI did this a while back and love them still. My only warning is that the blinds themselves tend to snap if they are old. So I've had to go in and do some replacements. NOT happy about that. LOL
ReplyDeleteThis idea is fabulous -- I am keeping it on my to do list.
ReplyDeleteyou are a genius!! I have to try this in my boys rooms. TFS.
ReplyDelete