Showing posts with label My Bedroom. Show all posts

Monday, March 1, 2010

Creating Metal Monogram Art

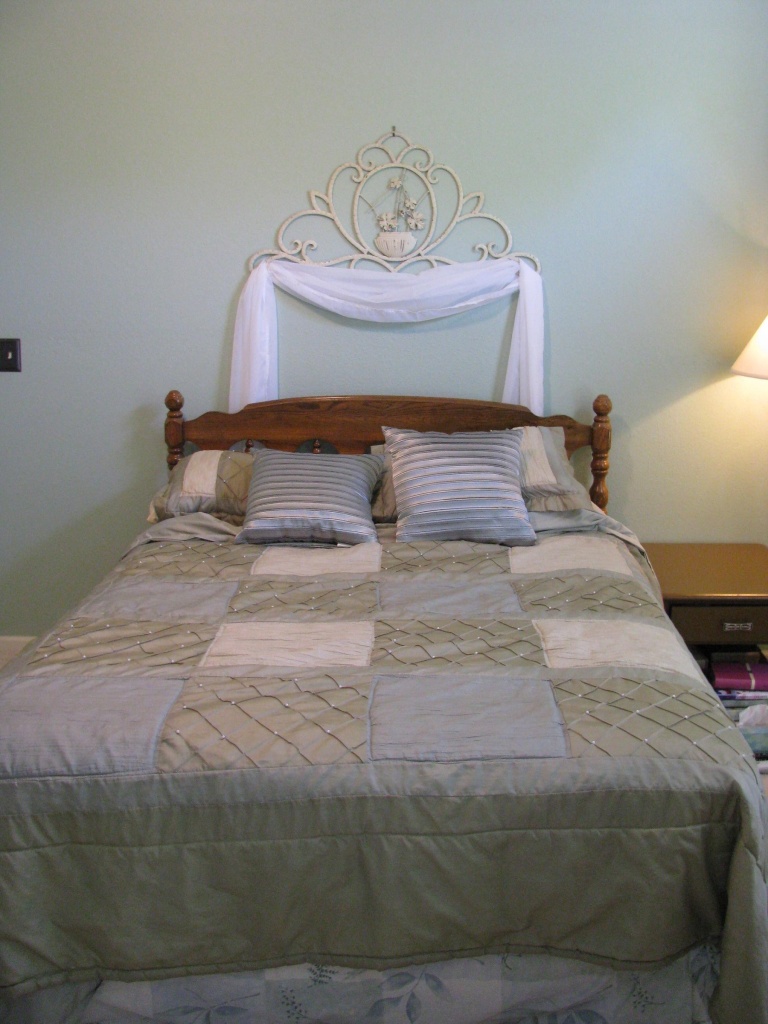
I wasn't sure what to title this project. It all started out with the metal wall art thing over the bed shown here. I purchased it several years, but it just didn't seem to stand out against the wall. I was also tired of the flower design that was in the middle. I mean my bedroom is already a bit too much on the feminine side for Mr. Delightful without having another flower in the room. One day, while drying my hair in the bathroom adjoining the bedroom and staring at the metal thing on the wall, I had an idea on just how to give it a makeover.


First I took it off the wall and had Mr. Delightful cut out the metal flower design from the middle. It took him all of 20 seconds to cut it out with a grinder (I think that's what the tool with the spinning thing that shoots out sparks when it cuts metal is called.). Than I used spray paint to give it a nice coat of glossy white paint. It was looking better already. Next it was time to raid my fabric stash. I decided to use this neutral fabric that had a pretty texture to it. I picked up this clearance fabric awhile back for $1.50 for 3/4 of a yard.


I traced around the middle oval and cut out the fabric to slightly smaller as the outside of the oval opening. Then it was time to break out the glue gun for some hot glue action to secure the fabric to the metal. I worked around the opening slowly to make sure the glue didn't dry on the metal before I attached the fabric.


When I had hairdrying breakthrough moment, I decided that a monogram in the middle would look perfect. I located this perfect little letter at Hobby Lobby. They have quite an extensive selection of unfinished wood letters. I thought the curly letter style gave it a bit of whimsy. The "L" was painted with the same paint as the metal art and then added to the fabric with hot glue. Now the metal art is ready for its close up.


And the full effect.


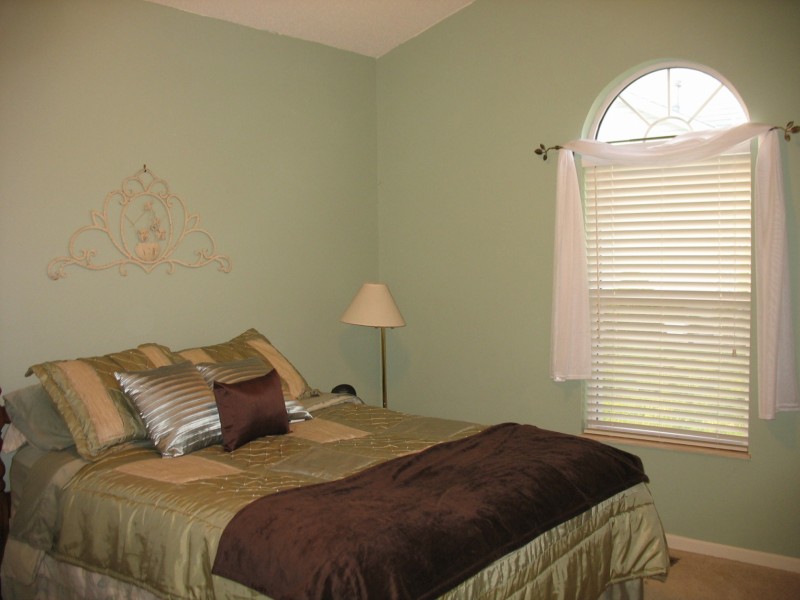
Yep, I'm really loving it. So much better and such an easy makeover. It's amazing how different my bedroom looked just a year ago.


And how it looks now. (Ignore the wrinkled comforter, I had just washed it!) 


Ahhhhh, so much more relaxing. I'm ready for a nap now.


Linking up to:


DIY Day @ ASPTL

Making


Monday, February 22, 2010

Nightstand Makeover Take 2

Wayyyy long ago. Like 6 months ago. Right after I started this blog, this was one of my first projects. I painted our old and beat up nightstand. (Which is really an end table that belonged to my great-grandmother and matches a table that was in Better Homes and Gardens and that is another long story you can read about here.)


The problem was I hated it. The color was not at all what I wanted. Not even close. I was hoping for more of a deep and elegant brown. Not this yucky, mud puddle brown color that I ended up with. On top of the horrible color was that fact that even though I let it sit for several days before I put anything on top of it, stuff kept sticking to the paint. I was so frusterated with it that I just left it like that, sticky paint and all. And hated it for the next six months. Only the cats seemed to like it, but they love anything they climb inside of.


I kept waiting for warmer weather so I could carry this sucker out the garage and attack it with a paintbrush. But winter seems to be stretching on this year with temperatures continuing to hang out below freezing. So I just spread a drop cloth in one corner of the bedroom and started painting. Mr. Delightful is learning not to ask questions.


The color is "Quiet Rain" by Glidden. It's yet another free quart from one of their paint promotions. They have kept me well supplied in paint for the past year. I was afraid it might be too close to the wall color, but I think it contrasts just enough.


I spent all day keeping the cats away while I was painting. After I finished the third coat (covering up that muddy brown was a pain) I left the room for a minute. I came back to find this:


Yes, that is a cat print embedded in my final, smooth coat of paint. And since cats have four legs, guess how many of those little paw prints were left in my perfect  good enough paint finish?

After applying yet another coat to try and cover up all the kitty fingerprints left behind, I decided that it needed a little adornment. So I ended up using my trusty Cricut to cut out a stencil. I ripped off a plastic-like cardboard cover from a travel guide to Gunnison, Colorado that I had laying around. It was the right thickness for a stencil and it was free.


I started out trying to make a pretty swirly outline as shown above. That didn't work out so well so I went the simpler route with just the solid swirl shape. The white paint is some Behr paint that I already had in my paint can stash. It is semi-gloss compared to the eggshell finish of the blue paint which made it stand out even more.


I added the handle back on and put the nightstand back in its corner. But it still looked like it needed just a little something more. So I decided to add a striped border around the edge. I pulled out a roll of painters tape and taped off a border.

Disclaimer: The way I made my border is not at all how your are supposed to do it. This is the lazy way to do it. If you are like me and are always looking for a shortcut and a way to do things that doesn't require hunting in the garage for the proper tools that you can never find unless your husband is around to direct you on where said tools might be hiding, then you might understand. But I don't recommend my method, because I didn't follow the rules and you probably should stick to the rules.

Here's how I shortcutted it. First, I didn't measure anything. No ruler, no pencil, no tape measure. I just sort of eyeballed where the first line of painters tape should go. That is the line closest to the outside. Then I decided to just make my stripe exactly the width of the painters tape. So I used the tape to mark off another line next to the outside box. Finally, I marked off one more box on the inside using the tape. Then I simply removed the middle line of tape, leaving an almostly perfectly marked border to paint my line. That doesn't make much sense when I try to explain it, but maybe a picture will help.


Still confused? Then do it the right way and measure everything out. Here's how mine ended up looking.


I started off painting the box using leftover paint from my kitchen. The color is Glidden's Whispering Wheat. It ended up looking too yellow though. So I pulled out my dark brown paint from our master bathroom makeover. This dark brown paint is actually a mix of Glidden Bittersweet Chocolate and some black Behr paint. I added just a little bit to some of the Whispering Wheat in a small tray and mixed them together. I love mixing paints and I do it whenever the color doesn't turn out to be the shade I want it to be. I guess I could call this shade Chocolate Wheat.


Here's how it finally turned out.


It's hardly perfect. The corners of my border are a bit messy and you can still see the outline from my first stenciling attempt on the drawer front.


But I'm happy with it. It looks so soft and romantic now. If a nightstand can be called romantic.

I added a picture from back when Mr. Delightful Dwelling and I were dating. It's one of those cheesey old time photos taken at Silver Dollar City, but I still love it. My hair was super long back then and I think Mr. Delightful's expression is pretty funny.


I think overall it looks much better than the mud puddle mess it was before. It went from "mud puddle brown" to "quiet rain blue".


Monday, October 19, 2009

Farewell TV, Hello Cozy Nook

I  was very happy with the way most of our bedroom looked. I love the wall color, the painted headboard project turned out wonderful, and I liked our bedding and pillows.

kitchen2 013

I also adore my loooooong, new IKEA curtains.

kitchen2 016

Then there was this corner. Not so lovely. First there was the dated dresser. Then the monster of a TV complete with various electronic acessories. We don't have cable or satellite so we had cords running up to the big rabbit ears antenna in the window. Nice and classy.
bedroom 004

Since we don't really watch much TV, it was easy to banish it from the bedroom. We didn't really need the dresser since we have another dresser and a walk-in closet big enough for our clothes. So those items were given away.

I had this chair hanging around. My mother-in-law gave it to us several years ago and I kept meaning to paint it so finally I broke out the spray paint. Trusty old Heirloom White paint.

paint 013

Now the corner looks like this. (No good room is complete without a cat of course.)


bedroom 011


The ottoman is from Target. I posted a couple weeks ago about the picture frames I found for $1 and dressed up with some ribbon. The star I picked up at Goodwill for $1. The small mason jar I found at a thrift store for $1.99. I filled it with some grass and flowers clipped from my yard.  The "Jardin" and the striped box I bought at Michael's awhile ago.  The pillow is one I had bought a few years ago from Old Time Pottery for $3. I covered it with some pretty fabric. The fabric is currently wrapped around the pillow and held together with safety pins since I don't sew. Hopefully my awesome MIL will take pity on me and sew another pillowcase for me. (She did a wonderful job on these other pillows.)

bedroom 017

I cut out a flourish stencil using my Cricut and the Storybook cartridge and used the stencil to paint a little design on the back of the chair. I also did some distressing using sandpaper to let the original wood and black finish peek through.
bedroom 024


bedroom 025

The transformation could not be complete without some assistance from my kitty helper. She did a very good job of pulling the grass out of the jar and dragging it around.

bedroom 014


I will once again be linking up to all the fun DIY and transformation parties on the following wonderful blogs:

DIY Day @ ASPTL


Wednesday, July 8, 2009

Weekend Projects Part 1

Right after I posted this on Wednesday, I read about the DIY party on A Soft Place to Land. So I'm ready to join in with this post and a couple others of various weekend projects I had going on.

I had several projects over the long weekend to spruce up and decorate the house. The biggest project was painting our headboard. Our headboard is a hand me down we've had since we got married. Here's the blah wood before shot:

bedroom3

Then after applying a coat of good old Kilz oil based primer and two coats of Behr touch of cream laytex paint I moved the new headboard back inside to show off it's transformation. I also added our new Shabby Chic bedding from Target, a bit of a splurge (anything over $20 is usually a splurge to me though), but our old bedspread was falling apart and had so many rips in it from kitty claws. So with all that here's the cottage look after:


Even the dresser got a little facelift. I added some new handles from Target ($9.99 for a pack of six.) I'm still contemplating painting it as well. Maybe a soft tan color to pick up the color from the comforter. What do you think?


So that's part one of the projects I had going on around the house. Go here for part two of my weekend project about furniture arranging and check out my side bar for links to more projects. Thanks for visiting and be sure to check out the DIY party from ASPTL.

DIY Day @ ASPTL

Friday, June 26, 2009

Show Us Where You Live Friday-Master Bedroom

Kelly's Korner has a weekly "show us where you live" party to show photos of your home. Today's room is the master bedroom. I really wish mine was finished before I posted this pictures for all to see, but here's the work in progress:


bedroom1

(The room looks really green here, but the color is more like the first two photos show. This is before I added the swag on the wall.)

On the to do list:

1. Paint furniture. Either white or dark brown. Or tan. I don't know, I can't decide. I'm thinking white with dark bronze colored hardware.

2. Paint or ditch headboard. I could paint the one we have or make my own fabric one. I'm leaning towards the fabric one.

3. New bedspread. I like the colors of the one I have, but it's falling apart and I want something without all the blocks like this one has.

4. New curtains. Ditch the scarf and add some real curtains.

5. Banish the TV from the room. We have this monster old TV in the room that needs to go. We also don't have cable or sattelite(we're too cheap) so we have these lovely rabbit ears that are a bit of an eyesore. More than a bit.

6. Rearrange the furniture? This is a maybe. I've considered putting the head of the bed under the window, but I don't want to block too much of the window. There isn't really any other way to arrange things other than that and how it is now.

All ideas and tips are much appreciated. Hopefully, I'll have some "after" photos to post soon.

***Don't forget to enter my giveaway for an area rug from CSN rugs***

Contest goes until Wednesday at noon.

LinkWithin

Related Posts with Thumbnails