Showing posts with label My Master Bathroom. Show all posts

Wednesday, January 20, 2010

Adding Cabinet Knobs to Vanity

One way we made the original vanity in our master bathroom look more finished and elegant was by simply adding some knobs to the doors. It previously was completely naked when it came to hardware. I picked up these knobs at Home Depot for $1.79 each.


Since my doors didn't have any previous knobs, I had to drill holes for the knobs to be screwed on. You can purchase little plastic guides to use to make sure all your holes for the knobs are in the right place. I'm cheap so I just made my own guide using a scrap of carboard that had a corner. I measured on the door where I wanted my knob to be and then marked that point on the cardboard by lining up the corner of the cardboard when the corner of the door panel. I poked a hole through the cardboard where that mark was.


I then used a pencil poked through the hole to mark on each door where I wanted to drill the hole for the knob.


Then it was as simple as drilling the hole and screwing in the knob. Simple change, big impact. (And yes that is a cat in the window if you look at the reflection. She loves being in photos)


Monday, January 18, 2010

Installing Peel and Stick Tile

So if your flooring looks like this:


And you would like something more like this:


But you don't have the time or budget for a major floor redo, one quick and inexpensive option is to use peel and stick vinyl tiles like we used for our bathroom makeover. These tiles have come a long way from what they used to be. There are many options to chose from in a wide variety of colors and styles. You can even buy ones that have grout lines to make them look more like a real tile floor. Here's some simple tips and tricks and the general how-tos on how to quickly and easily change your floor.

1. Measure your space.
This ties in with step #2. You need to make sure you buy the correct amount of tile for your space. Allow for at least 10% extra to account for mistakes and miscuts. Trust me, we had plenty of those. We purchased two boxes of 12x12 tiles and each box had 30 square feet. We have a lot of tile left over, but one box would not have been enough.

2.  Choose your tile.
We purchased our tile from Home Depot. Most home improvement stores carry several different brands and sytles of vinyl tiles. Whether you want something that looks like tile, stone, or wood, you can usually buy individual tiles for around $1 each to take home and view in your room. I picked out our tile in the store without even bringing home a test tile first. I saw the mix of browns in the tile and knew it was the perfect choice to blend well with our dark brown vanity and soft tan walls. I believe the color is called "beige slate."

Make sure you look at the numbers on the box to buy all boxes from the same batch. The back of the box should tell you what numbers to look for. This ensures that the colors will all match. It is usually recommded by the manufacturer to put your tiles in the room they will be installed in for 48 hours to acclimate them.


3. Prepare your floors.
For our space, we were applying the tile directly over the existing vinyl floor. You can do this as long as the flooring isn't curling up or heavily damaged. It must be firmly attached to the subfloor. You want a smooth, level surface to apply the tiles.

Begin by removing the baseboards. You could skip this step if you wanted to just apply the tiles tight to the baseboard edges. However, that would mean a lot more cutting and making sure your cuts are more precise. We removed the baseboard, although we never manage to get all the pieces out fully intact. Our baseboards are so thin that they usually end up splitting.

Use an undercut saw to cut off the bottom of your door jambs. Do this by laying a piece of tile against the door jamb so you know the thickness to cut off. This allows you to easily slide the tile under the door jamb when installing the tile.

Next, if you are in a bathroom, remove any existing caulk around the edges of your flooring or where the flooring meets the tub or shower. I used a utility knife and a flat head screwdriver to scrape out all the caulk.

If you are working in a bathroom, remove the toliet. I lost the arguement with Mr. Delightful Dwelling on taking out the toliet. I should have been more insistant that we remove it first. It would have made the job much easier in the long run because cutting tile to fit around a toliet is a major pain.

The final step in preparing your floors is to get them very clean. Sweep up any debris and mop the floors throughly. You want a nice, clean surface so the adhesive will stick.


4. Find your starting place.
The best way is to measure each set of walls and find the exact center of the room to start at. Use a chalk line to snap a line between each set of walls to find the center point. Since we were working with such a small space, we laid out several rows of tiles to find out the best starting place. You want to find the best layout that will put all the cuts at the walls and the full tiles in the center of the room. You also want to try to minimize the number of cuts you will have to make. Even if you are in a large room, it would help to layout several rows to find the arragement that works the best. For us, we started at the doorway with the tiles centered left to right if you were standing in the doorway..


5. Lay them down.
Begin to lay down the first of your tiles. You want to place each tile tight against the previous one for a nice fit. If you have a flooring roller to further press the tiles down, that is a plus.


6. Make the cut.
Once you get all the full tiles in, it's time to start cutting. Measure very carefully to get as tight as a cut as possible. We had to cut every tile against our vanity at a slight angle because it wasn't straight. To cut an edge tile, first lay the tile to be cut directly on top of the last row of full tiles. Then place another full tile up against the wall so it overlaps the loose tile. Using the second loose tile as a template, mark the line to be cut on the first loose tile.

A utility knife and a straight edge are one way to cut your tiles. We started with this, but it was so hard to make a straight cut that I ended up pulling out my paper trimmer. The one I use for scrapbooking. Mr. Delightful doubted that it would work, but it actually worked very well. I was able to use the guide and the blade to score each tile and then snap it.


It also worked well for some of the tricky cuts like around the wall dividing the shower from the tub. It may be helpful to use sheets of paper to first make a template of how the tile needs to be cut to go around plumbing or other weird shaped obstacles. Like around the toliet your husband wouldn't let you take out and required a lot of trial and error to get tiles to fit around it.

7. Finishing Touches
Once you have all the tile in, it's time to finish up by reinstalling the baseboard using a nail gun or nail set to drive the finishing nails below the surface of the trim. Fill in and touch up any nail holes. I always paint my trim first before installing it, I think it is much easier. Apply caulk using these tips for a pretty caulk line. I applied caulk all around the top edge of the trim to give it a crisp finish against the walls (which aren't perfectly even) as well as a line at the bottom of the baseboard next to the floor. I think it gives it a cleaner and more finished look.


8. Stand back and admire your new floor!

If you are thinking of installing laminate instead of vinyl tiles, I have some tips on that to because we used it in our hall bathroom makeover. See the laminate tips here.


DIY Day @ ASPTL


Wednesday, January 13, 2010

Towel Hook How-To


I promised to show how I made this towel rack for our master bathroom makeover and I'm back to show just how I put this thing together.

masterbath 202


First the supplies:
-Scrap piece of lumber. I used a piece of 2x8 cut down to about 22" long.
-Mod Podge
-Primer (if using bare wood)
-Paint
-Hooks (Mine were less than $4 each at Lowe's)
-Graphic to add to center

The graphic I chose I found on The Graphic Fairy. If you have not been the Graphic Fairy blog you must see it. You could spend hours looking through all the wonderful graphics and crafts she has posted.


My graphic is from an old French soap label and says "Natural Soap, against all diseases of the skin." I had to use an online translator for that. My French teacher would be so disappointed. I liked the antique look, the shape and size of the label were perfect, and everything just looks more elegant when written in French.
 
So first I primed and painted the front and sides of the board. I didn't bother with the back. Then I copied the graphic into Word and blew it up to the size I wanted. I printed it out on regular printer paper. I used my paper trimmer and scissors to cut out the shape and centered it over the board.

masterbath 155


Next it was time to break out the Mod Podge. I hadn't used Mod Podge in probably 10 years or so. I chose the matte finish because I didn't really want it to be shiny. I used some Mod Podge to adhere the label and then applied several coats over the label and the entire board. Some of the ink smeared a bit, but I figured it just gave it more character. I wasn't going for perfection here, but something aged and worn looking. Or at least I'll pretend that's what I was going for.

Once everything dried it was time to attach the hooks. I had to be careful attaching the screws with the hooks because they were longer than the thickness of the board and I didn't want the screws to go all the way through yet. So I put the hooks on most of the way without fully pushing the screws through all the way until it was mounted on the wall.

masterbath 156

It was finally time to hang the board on the wall. I used my fancy new stud finder to find the location of the stud in the wall. Then I used two screws directly into the stud to hold it on tight. I wanted it to be strong enough to carry the weight of those wet towels without pulling off the wall like our old towel bar did. Three times to be exact.
I used spackle and paint to cover over the screws. Wood putty would probably have been better because of the size of the holes, but my wood filler was all dried up in the tube. I do have an idea to cover up the screw holes though. I will post about that when I find time to complete that little project.

masterbath 203

Once the screws were in the studs, I simply tighted the screws that held the hooks into the board and it was all set to go. Tres beau! J'adore!

abath10


Tuesday, January 12, 2010

Mini-Blinds Transformed into a Roman Shade

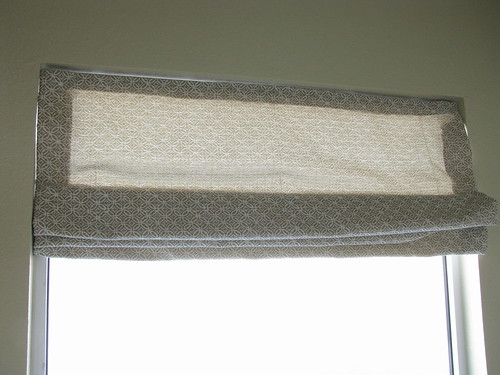
I showed off this roman shade that I made for our master bathroom makeover using fabric and an inexpensive plastic blinds. The idea was originally featured on Little Green Notebook and I also saw a version on A Penny Saved blog. It's not a difficult project, but it takes a bit of time. Mine was a bit trickey just because of the wide width of my window. Here's the rundown how I created my version.

masterbath 233

The materials you need are:
-mini blinds to fit your window.
-fabric slightly wider and longer than your blinds.
-Fabric glue. The tutorial says not to use hot glue. I'm not sure why, but I was scared away from the hot glue so I bought fabric glue.
- A tape measure
-Scissors
-A flat head screwdriver may be needed

My window is a goofy size, 47" wide. I finally found blinds that size at Lowe's for only $11. I used 54" decorator fabric from Joann's. It was originally around $25 a yard (yikes!), but I ended up getting it for under $6 a yard on clearance combined with an additonal sale on clearance fabric combined with an extra discount coupon for 10% off everything.  I used about a yard and a half for my window which is 45" tall. I wish now that I had bought more of the fabric because I ended up liking it so much!

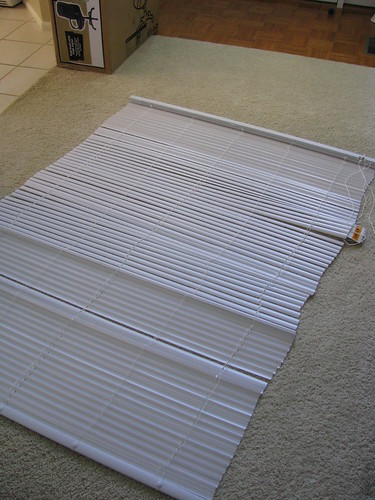
First begin by lowering the blinds all the way and laying them out flat.

masterbath 159

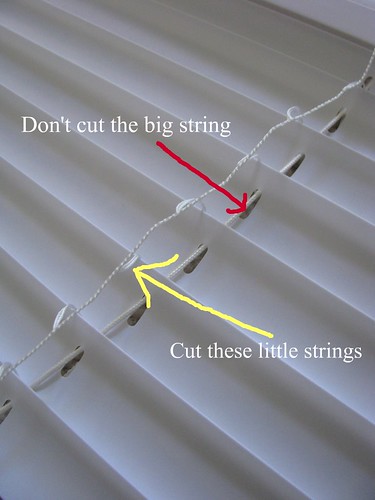
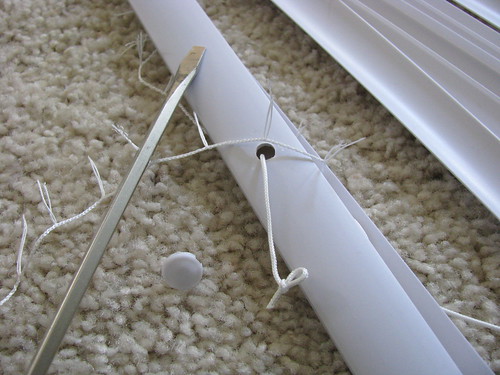
Next you want to cut all the little, thin tilt strings around each blind slat. My wide blinds had 5 sets of these. I was able to run scissors along them and cut them pretty quickly because they are so thin. Do not cut the thicker, lift strings! You will need these for the blinds to work.

masterbath 160

After cutting all the tilt strings, remove them and the strings that the tilt strings are attached too. Again, do not cut the larger lift strings. You should only have the thicker lift strings left. Then you want to pop off the little plastic circles at the bottom in order to get out the end of the lift strings, unknot them, and pull off the bottom thicker slat. Save this piece, you will need it again.

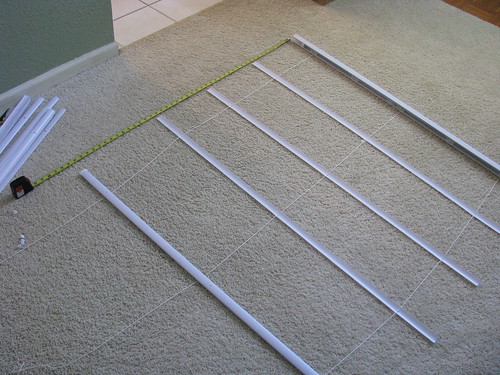
Remove and discard all the other slats, leaving only those left that you want to use for the folds in your shade. I decided to only use 3 middle slats because my window is not very tall. Therefore, my shade will have 3 folds in it spaced slightly over 11" apart. If you have a taller window, or want your folds smaller and closer together, than you would leave more slats left on the strings.

masterbath 168

You should end up with something like this. Again,I left only three slats on the strings for mine.

masterbath 171

Use the tape measure to line up your slats so they are evenly spaced. Mine are spaced just over 11" because 11" x 4 spaced=44" and I wanted my shade right around 45" tall. You will want to cut your lift strings down to only a few inches longer than the length you want your shade to be. Your shade should be about the length of your window or slightly longer. Reinstall the bottom, thicker slat piece.

Now you are ready for your fabric. Lay out the fabric face down and place your blinds on top. I put my blinds so the pull cord was facing up, but it probably doesn't really matter. Cut around the fabric, leaving a couple inches on each side.

Now it's time to glue. First fold over the top of the fabric so that you have a nice crisp seam and glue. Then glue the top of the blinds on top of this fabric. You want the crisp seam to line up with the top edge of the blinds. Do not glue the very ends (left and right side) to the fabric though, leave about 2"-3" loose and not attached to the top bar so that you can reinstall the blinds later. (See the tutorial at Little Green Notebook for more info. on the gluing process since I didn't take as many photos as I should have!)

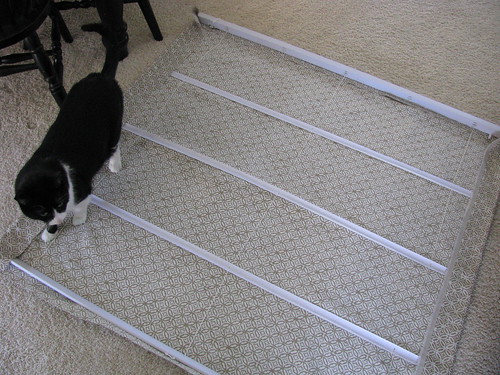
Next glue your slats down to the fabric. I put them so that the rounded side was against the fabric so that the glue and the slats had the most contact with the fabric.

Then fold the sides in and glue those down.  Finally, fold up the bottom and glue it to the bottom slat piece. I ran out of fabric glue so I did use hot glue on the very bottom piece. It worked fine. If you have a kitty to help you hold down the edges while gluing, that can be a help too. Or a hindrance when they try to eat the strings.

masterbath 182

After letting everything dry for a few hours, you can install the blinds just like regular mini blinds. You then may want to use glue or double stick tape to attach the ends of the fabric to the mounting brackets on the ends of the blinds. (See the post on a Penny Saved for more detailed info on this part.)

Here's how my blinds look when they are completely down. (I made them a little bit short, oops!) You use the pull cord just like you would with the regular blinds to raise and lower the shade.

masterbath 185


It probably sounds a bit complicated, but it only took me an hour or so and I love the result. I will be trying this in another room sometime soon.


Monday, January 11, 2010

Master Bathroom Makeover Revealed

Want to see what we accomplished in the past week?


Compared to how it looked like to begin with:


The messy before:


The spa-like after:


From builder grade:


To "is this really my bathroom?"

abath4

And now for the overview of what we did. I poster earlier about how I painted the vanity and changed out the light fixture and faucets with help from Mr. Delightful Dwelling. The walls are Behr Oat Straw which I also used in our home office. I also added new knobs to the vanity doors and we added trim around the gigantic mirror. We planned on using regular moulding cut to fit and painted to match the vanity until we discovered this trim called "Mirror Edge" on clearance at Lowe's. It just happened to be the right color and the pieces were even the perfect length that exactly matched our mirror.

We used vinyl peel and stick flooring to cover the stained and scratched white sheet vinyl we had. The pattern is called beige slate and we purchased it at Home Depot. I will have an upcoming post dedicated to tips on laying vinyl floor tiles. They are a cheap and easy fix to hide an ugly floor.


This metal shelf thing was given to me by my MIL. It was originally a dark color, but I sprayed it with some Heirloom White. Now it holds extra towels and q-tips.


I made this towel holder using scrap lumber and hooks from Lowe's. I'll have a post about how I made it coming up later this week.


I shopped around our house looking for accessories to use and came up with a mirror, starfish, and vases I bought from IKEA over the summer.


This bowl was a 70% off find at Kohl's. I use it to hold my makeup and moisturizer. I'm a pretty simple girl when it comes to cosmetics. Foundation, blush, mascara, and chapstick are all I need.


A jar I bought last year at Gordman's holds my Olay Daily Facial cloths.


I bought some soap pumps at T.J.Maxx and filled them with  my shampoo and conditioner. They are much prettier than having plastic bottles in bright colors scattered about. Everything sits on a plate I picked up at Marshall's. The mercury glass votive holder is part of a set that is also from Marshall's.


I made my own roman shade using fabric and a cheap plastic mini blind as inspired by The Little Green Notebook. Upcoming post to follow later this week on the how-to and tips.


I added a piece of framed art I found on clearance at Old Time Pottery.


I'm a little unsure about the diamond tins on the wall. They can hang either as a diamond as shown or tilted the other way so they hang like a square straight up and down. Should they stay or go? Or be moved in a line up or down?


I'm still amazed when I go into the room because it feels like completely different bathroom and we made all the changes in just over a week and on a small budget. This is by far my favorite room makeover in our home.


Here's the cost breakdown:

Flooring: 2 boxes @ $33 each = $66 (Home Depot)
Light above vanity = $98 (Lowe's)
Ceiling Mount light (you can barely see it in the first photo)= $10 (Home Depot)
Trim around mirror= $15 (Lowe's)
Knobs on vanity= 4 @ $1.79= $7.16 (Home Depot)
Faucets= 2 @ $29 (these are now only $25 at Home Depot) = $58
Bathroom Rugs = $14.99 (T.J. Maxx)
Soap Pumps, bowl = $4.99 x 2=$9.98 (T.J. Maxx),  $2.29 (Kohl's)
Wall Paint, Behr Oat Straw=$32 (Home Depot)
Toliet Paper Holder and Hand Towel Holder = $18 (Home Depot)
Robe Hook= $4 (Home Depot)
Towel Hooks =$3.79 x 2= $7.58
Trim = $12 (Lowe's)
Vent Register Cover = $12 (Lowe's)
Frame and artwork= $3.74 for clearance frame (Target) $11 for clearance art (Old Time Pottery)
Blinds=$11 (Lowe's)
Fabric=$12 (Joann's)


Grand Total: $404.75
We seem to be spending right around $400 in every single room we makeover. We had giftcards that covered over $200 of the project so our out of pocket cost was really not that high. All the other accessories that I didn't list a price for were things I already had on hand.


DIY Day @ ASPTL


LinkWithin

Related Posts with Thumbnails