Thursday, September 2, 2010

Sneak Peek Photo of My Kitchen Transformation!

 Here's a little sneak peek of my kitchen while it was decked out with bridal shower goodies:


And a reminder of how it used to look:


More photos and details to come as soon as life slows a down a little! I will have another crazy week next week and then I should be able to get back into some more regular blogging. This summer has just been so full of projects and events that I haven't been able to make time to fit in some much needed blogging updates of all the changes.


Saturday, August 28, 2010

I'm still alive, part 2!

I'm still here, trying to recover from all the madness that this summer has been full off. Right now I'm relaxing after hosting a bridal shower and stuffing way too many people in my little house. Which looks wayyyy different than the photos on my blog show.

My living room and dining room are no longer green. My oak cabinets are no longer oak. My white countertops are no long white. And I'm being mean and not sharing photos just yet! I'm still waiting for my elusive new area rug to arrive. It was on backorder and won't arrive until September. Then I will start going photo crazy!


Thursday, July 8, 2010

I'm Still Alive!

Umm, so I completely dropped off the blogging radar for awhile. So sorry to just up and disapper like that.  If you are wondering what can make a blogger vanish from the wonderful world of blogging, let me give you some sneak peeks of what I've been working on like crazy.

My kitchen spent some time like this:


Our garage spent many days full of this:


Our yard was transformed to this:


We went hiking in Indiana:


Visited relatives and saw the sights in Arkansas:


Went to a wedding:


And another wedding:


And then last weekend celebrated America's birthday:


Many more details and some major before and afters to share! Now I have to get ready to paint my living room....

Tuesday, May 18, 2010

Laminate Bookcase Makeover-Part 2

So, way back when, I posted the first laminate bookcase that I gave a makeover to. Then it took me several months to get around to doing a post about the second bookcase's new look. I think it's because I like how the taller bookcase is decorated and accessorized better. This one is a bit too cluttered compared to the first one, but it is useful for storage purposes. Here she is hanging out in a corner of our master bedroom.


This bookcase had the same paint treatment as the first one. Some primer followed by a coat of Behr's Pot of Cream paint in semi-gloss. I had to whack the shelves in place with a hammer because they were so tight fitting back into the bookcase after the layers of paint were added.

I also added the same moulding around the top using my nail gun friend.


I found some pretty damask wrapping paper at Hallmark to add to the back of the inside. I love the blue and brown colors together.


I decided to use the bottom shelf to hold my scrapbook albums. I wished that they matched a little better because all the colors look a bit chaotic together. I thought about doing a little curtain in front like I did for the taller bookcase, but the scrapbooks stick out too far outside the shelves for that to work. I also added a couple picture frames and some candles to fill in the shelves.

Over the bookcase, I decided to hang this shadowbox I bought at Marshall's for $12.99. The front of it has a handly little door that you can pull open to easily get to the inside. I figured it would make a nice place to hang and display some of my jewelry using the pearl pins that were included with the box to hang the necklaces and earrings on.


The door keeps my necklaces  safe away from Emma's little paws. She looooves to chase after my necklaces. In face, she even comes running as soon as she hears my jewelry box or the shadowbox door open and tries to grab the necklaces out of my hand.


I added a scrap of beadboard to cover the top of the bookcase. This also helped hide the gap between the edge of the top of the bookcase and the inside edge of the trim around the top.

A reminder of how the bookcase looked before in all her light oak glory holding books in my craftroom/workout room/storage area/room in progress:


And now:


Wednesday, May 5, 2010

Burlington Coat (And Home Decor!) Factory

I had not visited our local Burlington Coat Factory store in probably 10 years. That is until I saw Centsational Girl's post on all the wonderful home decor goodies she had discovered there. I was especially drooling over the variety of Waverly accessories in a lovely blue and white pattern. The colors were just too perfect for my craftroom makeover in progress that includes this spruced up laminate bookcase.


While I didn't find quite the variety of fun accessories that Centsational girl found at her local store, I did manage to snag a few cute deals.

The first thing I grabbed was this lovely, fabric storage box. I can never have too many storage boxes and the price was perfect at just $6.


I resisted all the other blue and white boxes, artwork, mirrors, and curtains. I did pick up one of these plastic bowls though for a whopping $1.49. It looks a bit green in this photo, but it is more blue in person.


My final Burlington find was this pretty blue glass vase or candleholder. It was on clearance for just $2.48 and I had to stop myself from picking up several. They also were available in a green and brown color.


All together I spent $10.74 including tax. Not bad for a shopping bag full of cheerful accessories.

Monday, May 3, 2010

Through the Lens

I posted the other day about how I recently purchased a used Canon xTi camera. I had also spent $100 on a 50 mm f1.8 lens. I love that little lens and it takes amazingly sharp photos for the price. However, it is a fixed lens. That means there is no zoom so 50 mm(or 85 mm on my cropped sensor camera) is all you get. I wanted another lens that would give me a good wide angle as well as a moderate telephoto zoom. Basically, a decent all around lens. After spending a few weeks researching my options on my very limited budget (lenses are super expensive!) I decided on the Canon 18-135 mm IS lens.

That lens happened to be sitting on my doorstep today.


I'm already loving this guy and have been going crazy snapping photos around the house. I'm super excited about the fact that I can now photograph entire rooms of my house because of the wide angle end of the lens.


I think that is the best photo I have ever taken of my living room. This super, little all around lens will come in quite handy as I document the many projects I have in the works. It will also help when I call on the assistance of all you readers out there to help me pick out paint colors, curtains, and even flooring. I can be a wee bit indecisive at times. Or all the time. =)

Thursday, April 29, 2010

Kitchen Projects-Part 1

So for awhile I've been trying to be patient and not do anything to my kitchen cabinets until we replace the countertops. We are planning to do that sometime this year. I wanted to wait until we had the new countertops installed before going ahead with painting my orangey-oakey-boringey-me-no-likey cabinets. That way, I would have the counters to match different paint colors chips to and select the right tone and shade of paint. This is important because I'm probably going to be brave and paint the upper cabinets and lower cabinets two different colors.


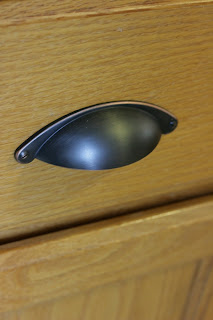
However, I was off work the other day and I just couldn't take it anymore. My plain, unadorned cabinets needed something, anything to spruce them up. So I made a trip to Home Depot and $50 later I came home with some oil-rubbed bronze knobs and pulls for my cabinets. (One good thing about having a small kitchen, buying knobs is cheap when you don't need very many.)

After a couple hours of drilling and going back to Home Depot for longer screws, here is a peek at my cabinets now. These knobs were cheapies at $1.50 each.


The pulls were a bit pricier at almost $4 each. Good thing I only have four drawers in my kitchen. Well, it's only a good thing because it saved me money in this instance.


Mr.Delightful Dwelling came home from work just as I was finishing up. There was wood dust everywhere because I had to drill all the holes for the hardware since our cabinets never had any. He asked "What in the world did you do to make such a mess?!" He was totally oblivious to the new cabinet knobs, he just noticed all the dust everywhere. Men. As long as he lets me do what I want to the kitchen, I can't complain too much when he doesn't notice what I've done.

I can't show off the whole kitchen just yet without revealing my next mini-makeover project. I have a new wide angle camera lens ordered and on its way. Then I can get some good shots of the whole room to share.

Wednesday, April 28, 2010

Mirror Makeover

Ok, first off I'm sorry that I disappeared for a gazillion years in blogging time. If you are reading this, thanks for not totally forgetting about me! I have so many projects to share and some major changes planned for the upcoming months.

Let's start out with a super easy makeover. I found this gold mirror at a thrift store. I love the scrollwork of the frame, but wasn't so thrilled with the gold color.


Enter spraypaint of course. I used a black metallic Rustoleum paint. I sprayed on a light coat so some of the gold pops through. The scrolled edges of the frame made it a pain to tape paper over the mirror. I managed to only get a bit of paint to seep through which I was able to scrape off using a fingernail. Here is how she looks with her new paint job.


I decided the perfect place for the mirror was by our front door. I'm keeping an eye out for a small console type table to put under the mirror. Or I could add a shelf instead. I have a big project planned for this wall though that will have to come first before I make a final decision. (Hint, think board-and-batten.)


Tuesday, April 13, 2010

Too Many Projects, So Little Time

I didn't mean to drop out of blogland for so long again. I've been so busy working frantically on several projects around the house. We are planning on hosting a BBQ on Saturday and with up to 20 people showing up at our house, I've been very motivated to wrap up all the little changes around the house I have been putting off. I have three big kitchen changes to reveal, my second laminate bookcase makeover to show off, and a few simple makeovers to share. I'll try not to leave you hanging too long!

I also recently purchased a used Canon DSLR camera so I will have much clearer and brighter photos to share. I'm amazed at how sharp my photos are compared to my point and shoot camera, especially indoors where the lighting is always an issue.

In the meantime, here are some photos to share that I have taken around the house with my new-to-me camera and 50 mm f1.8 lens (the nifty fifty lens, what a bargain!) I'm still learning all the tricks to getting great photos, but the learning process is so fun.


Wednesday, March 31, 2010

A Custom Plant Bench

I posted a few weeks ago about this custom shoe bench we built using Ana's plans from Knock Off Wood. Since it hasn't fallen apart yet, we trusted our carpentry skills enough to construct another bench.


So it was time for some more compressor power with my newest BFF, the wonderfuly delightful nail gun.


Within 20 minutes we were the proud new owners of this bench. You can see the plans for this bench on Knock Off Wood here. We did modify the plans slightly by not notching out the legs on the sides. We were feeling a bit lazy even though we have a jigsaw.


I gave it a couple coats of paint and primer (Behr Touch of Cream) and brought my new bench inside. It was just the right size to fit in our kitchen bay window. I needed something to put my ever growing plant collection on and this bench was the perfect construction project for the job.


Of course like any project, it's not perfect. It's so hard to find lumber at the big box store that is not warped or has tons of knots. We didn't nail one of the legs on very straight. The bench even wobbles back and forth if you try to sit on it. However, I still love that we built it ourselves and it works perfect as a place for my mini indoor garden.


Now if only this photo didn't remind me that I need to replace or repaint that vent cover. It really sticks out against the white!


Monday, March 29, 2010

Laminate Bookcase Makeover-Part 1

I'm sorry that I haven't posted in almost two weeks. I was fighting a terrible cold so blogging and home projects were just not happening for awhile. I am finally back in action with several finished projects to share.

The main project I have been working on is to update my craft room. I posted the crazy "before" photos showing the cluttered mess the room had become. After giving the room a coat of the same paint color as our hall bath (Behr Rain Washed), I turned my attention to conquering the clutter problem. One major problem I wanted to tackle was to create a prettier storage area using one of the existing laminate bookcases I had. The bookcase needed to hold a hodge podge of mismatched photo albums, magazines, and books. Somehow I needed to figure out a way to make everything look more coordinated. I saw this photo on the BHG site and knew right away it would serve as my inspiration.


Here's how my version turned out.


And a reminder on how the bookcase started out. You can see it on the very left of the photo below. It was a super cheap laminate bookcase in a pale oak color that we purchased five years ago. We also had a shorter version of the same bookcase shown in the right of the photo. Both of these bookcases have been completely transformed. I will show the breakdown on how I gave the tall bookcase a makeover in this post. I will have another post later to reveal what the smaller bookcase looks like.


When I did some research online to find out if paint would even stick to laminate, I came across a very helpful post on the subject on the blog Living with Lindsay. I mostly followed her instructions which really ended up being the same steps I used when I painted the bathroom vanity cabinets in both our hall bath and master bathroom. Sand, prime, paint, and be very careful not to scratch anything!

1. First step, sanding. I used our power sander to sand every surface except the inside backing which I planned on covering up. I used a fairly high grit sandpaper. You just want to lightly scratch the surface without going all the way through. You should see little white flecks of laminate coming off.


2. Trim it out. This step is optional, but gives the piece a more finished look. If you have a bookcase that is totally plain on the top like mine were, you can add some moulding to give it more substance. We used a miter saw and a strip of moulding to quickly add some trim pieces around the top edge. Of course I used my wonderful nail gun to secure the trim. Here's the bookcase all trimmed out and sanded down.


3. Prime time. I used Kilz water-based primer for the large bookcase and oil-based for the small bookcase. I prefer oil based because of the extra durability and stickiness, but I went ahead and used up the last of the water based primer that I already had left before purchasing another quart of oil based primer. I let the primer dry overnight before moving on to the painting step.


4. Time for paint. I used cream Behr laytex semi-gloss paint that I have used on several different projects. Both bookcases were given the same paint color.  I let both bookcases dry for five days before putting anything on top of them. This is very important. If  you don't let the paint totally dry and cure for several days, you could end up with things sticking to the paint or the paint chipping more easily.


5. Prettify the inside. Just like in my inspiration BHG photo, I wanted to add something to the inside back of each bookcase. I found a roll of wrapping paper on clearance at Target for $1.74. The colors just happened to be perfect for the room. You could also use wallpaper or even fabric.

I used the shelves from the bookcase as my guide for how wide to cut the paper. Both bookcases had adjustable height shelves.


Then I just used double stick tape to adhere the paper to the back of the bookcase. A craft knife came in handy to trim the paper tight to the edges of the sides, top, and bottom.


6. Use a curtain to hide clutter. I picked up a simple tension rod at Old Time Pottery for $1.99 to hold the curtain and fit between the bookcase sides. The blue and white fabric was a $4 purchase at Joanns Fabrics. Since I don't sew, I used some iron on tape to hem each side and the bottom. Now I can hide the mismatched books and albums behind lovely and inexpensive fabric.


7. Add accessories, then step back and enjoy your bookcase's new look! I shopped the house for decorative touches to fill the top two shelves and also picked up a few more items while out shopping. The mason jars I found at a thrift store for $1. The silver globe on top if from Home Goods. The white bird and topiary are from Michael's. (Free for me with a giftcard!)  The sleeping white ceramic cat was a Dollar Tree find. Inexpensive storage boxes from IKEA help corrall my endless supply of magazines and some general crafting goodies.


I am very happy with how my bookcase turned out. It makes me smile. =) I did scratch the paint in a few places while putting the shelves back in. Otherwise the paint seems to be sticking well to the laminate.


I will be back to post later on how the smaller bookcase is looking these days. It has been moved to a different room.


LinkWithin

Related Posts with Thumbnails